Panzanella (Bread) Salad

Panza-what? This Tuscan salad is a mouthful to pronounce. Traditionally, it contains oil, vinegar, onions and other vegetables with the bread soaked in the liquid. My favorite way to prepare it keeps the bread slightly crunchy still and makes the most of those last few summer-kissed tomatoes.

Continue reading

Posted in Salads, Vegetarian | Tagged , , , , , , , , , | 1 Comment

Chocolate Covered Cherry Mason Jar Cakes (and a road trip)

Every Labor Day weekend my husband, friends and I cram ourselves into our SUV and make a 6 hour drive to Buffalo, New York.

Continue reading

Posted in Cakes & Cupcakes | Tagged , , , , , , | 4 Comments

Cherry Salsa & Spiced Pork Chops

Cherry season is over. It is a sad time for me because that is one of the things I look forward to the most during summer. Plump, bountiful and finally reasonably priced I stock up, pit and freeze as many as I can afford get my hands on every season. This is what I decided to do with the last of this year’s bounty.

Title 1

Deep, dark Bing cherries are my absolute favorite and Rainier cherries take a very close (almost tied) second place. They have their own unique qualities that I love so I decided it was time to make something unique utilizing these two bite sized drops of deliciousness.

Bing cherries are acidic, making them the perfect component for a salsa. I wanted the salsa to have a nice balance and Rainier cherries are the perfect way to add the sweetness. I also added finely diced red onion, jalapeño and cilantro to bring some heat and savory flavors to the party.

I pitted and halved the cherries. I then chopped half of them a little more so there was some varying sized pieces and texture. I mixed everything, added a pinch of salt and let it sit at room temperature until I served it a few hours later.

Then there is the matter of the pork chop. You cannot just eat this delicious cherry salsa with some chips and call it a day. No, it is unacceptable. You may however, find some amazing thick cut pork chops and season them beautifully, cook them to perfection, serve this cherry salsa on top and proceed to have that for dinner without a vegetable or a salad or anything else. That may or may not have happened…

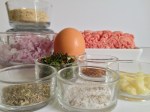
For the pork chops I made a simple spice mix, rubbed it on the chops and then let them sit in the fridge for a couple hours. The spice is a mixture of coarse kosher salt, black pepper, garlic powder, paprika and cumin.  You want to take the pork chops out of the fridge 30 minutes prior to making them so they can come to room temperature.

When you are ready to cook the chops, preheat the oven to 350 degrees and place a skillet over medium-high heat. Brush a small amount of canola oil on one side of the chop and place oil-side down in pan. After 2-3 minutes check to see if it is browned, flip and immediately transfer into oven and cook to desired doneness. I prefer pork almost completely cooked and it took about 15 minutes to reach 145 degrees. Move pork to a cutting board and let it rest 10 minutes.

Top with cherry salsa and serve – with or without vegetables.

Ingredients:
Cherry Salsa:
1 cup fresh Bing cherries
1 cup fresh Ranier cherries
½ medium red onion, finely diced
1-2 jalapenos, finely diced (remove the seeds and ribs if you like it less spicy)
¼ cup fresh cilantro, finely chopped
1 tsp salt

Spiced Pork Chops:
2-4 extra thick, center cut pork chops
1 Tbsp ground cumin
1 tsp garlic powder
1 tsp paprika
2 tsp kosher salt
½ – 1 tsp ground black pepper

Instructions:
Cherry Salsa:
-Pit cherries and halve
-Coarsely chop half of the cherries
-Mix in remaining ingredients
-Let sit at room temperature, stirring occasionally until ready to serve
-Store long-term in refrigerator and let come to room temperature before serving

Spiced Pork Chops:
-Mix all spices together to combine
-Pat pork chops dry with paper towel
-Rub seasoning mixture on all side of pork chops
-Cover and refrigerate at least two hours (or overnight)
-Remove from fridge 30 minutes prior to cooking
-Preheat oven to 350 degrees
-Heat oven safe skillet over medium high heat
-Brush one side of chops with oil and place oil side down in pan
-Wait 2-3 minutes until browned on one side and flip
-Immediately transfer skillet to oven and cook 10-20 minutes or until internal temperature reaches –145 degrees
-Transfer chops to cutting board and let rest at least 10 minutes before serving


Posted in Gluten Free, Pork | Tagged , , , | 2 Comments

Cupcake Smash!

The birthday party for a one year old really has become quite the affair over that past several years. The planning, guest list and games – it has become similar to planning a baby or bridal shower. All of that work and in reality they will not remember a thing about it. However, for the family and friends it creates some amazing memories to look back on when the child is older. To me, a large part of life is about sharing love and joy with others. What better way than to create a giant cupcake for a one year old to crush in a matter of minutes?

This is not a recipe for cake because I (gasp!) used a boxed mix due to the volume I was working with. I did however manage to take a few pictures of the fun process and will share the buttercream recipe and assembly. I used this cupcake pan and it really crated a great size and baked perfectly. This was done on day one.

Day two I planned to complete the entire thing but after baking and decorating 72 normal cupcakes (with the help of a dear friend) I was just tired of looking at sugar and cake for the day. For the bottom half of the cupcake I frosted and diligently smashed sprinkles into it with an extra set of hands (the mess I was making was unreal). In hindsight I would have frozen the bottom half first and used cardboard rounds on the ends to help “roll” it in the sprinkles. Live and learn.

On the day of the party I placed the bottom half on the cardboard round and spread a nice dollop of frosting on top to adhere the “frosting” half of the giant cupcake. I piped rosettes using the #31 closed star tip starting on the bottom and slowly working to the point at the top.

The regular cupcakes were piped using the 1M open star tip. Several days prior fondant number 1’s and flowers were prepared to decorate the regular cupcakes and smash cake.


There is nothing quite like watching a one year old completely demolish the cake you spent over two days working on. To see the glimmer in their eyes and delighted giggles each time they grab a handful and dutifully smash it in their hands and mouth…that to me makes is worth it.

Basic American Buttercream

Ingredients:

  • 1/2 pound butter (2 sticks)
  • 2 Tbsp vanilla extract
  • 3 Tbsp whipping cream
  • 3-4 cups powdered sugar (start with 3 and add more if desired)

Instructions:

  1. Whip butter for several minutes until smooth and pale in color.
  2. Whip in vanilla and cream
  3. Slowly add powdered sugar until desired consistency is achieved

*I always store this covered at room temperature 1-3 days. You can certainly refrigerate, but will want to remove about half an hour prior to serving so it can soften.

Posted in Cakes & Cupcakes, Everyday Celebrations | Tagged , , , , , , , , | 2 Comments

It’s a Meatball! (Burger)

Homemade meatballs are a favorite in our house. There is something special about spending a lazy Sunday afternoon rolling them and letting them finish baking in a giant pot of homemade red sauce. Served with fresh pasta and garlic bread it definitely tops the comfort food all time favorite list. What about simplified version of this meal though? Same comforting flavors and three types of delicious cheese all served on a hearty bun. The meatball burger is born.

We begin with the cheese. This cheese spread is heaven slathered on a bun. Creamy and smooth ricotta forms the base for nutty, salty Parmigiano Reggiano to round out the party. Fresh chopped sweet basil is mixed with black pepper to make this little cheese explosion even more flavorful.

Next, we make meatballs. Rather, we are going to make one giant meatball. The best meatballs are a mix of pork, beef and veal. If you cannot find a mix of these then ask your butcher to make it for you. Don’t have a butcher? Yes you do, they are at your grocery store. All you have to do is ask if they can make a blend for you. Worst case you come home with a package of beef and pork and do it yourself.

I made these burgers the exact same way I make meatballs, minus rolling them. Add an egg, breadcrumbs, grated onion and garlic, dried oregano, fresh basil, red pepper, salt and pepper. Grate the onion and garlic so it mixes well and you do not end up with raw hunks. Have you ever wondered why breadcrumbs are called for in many burger recipes? Mixing them with a little milk allows the patties to stay soft and tender. You also want to mix the ingredients gently so you do not end up with hockey pucks. After forming the patties dent them with your thumb before cooking. It will help them not to shrink too much and result in a more even burger.

To cook, place patties in a skillet over medium heat. Cook for 3-4 minutes and flip. Resist every temptation to them smash them down with your spatula. You worked so hard for them to be tender and juicy. Top each with red sauce and left finish cooking, about 3 minutes. Top with a slice of our third and final cheese, provolone. To serve, spread a generous amount of the cheese heaven on the top half of a toasted bun and your favorite red sauce on the bottom.

Top the burger with peppery arugula and dig in.

https://therubykitchen.com/2014/08/04/meatball-burger/

Ingredients:
 
For the Cheese Spread:
1½ cup ricotta cheese
½ cup Parmigiano Reggiano
3 Tbsp fresh chopped sweet basil
Pepper to taste
 
For the Burgers:
1 pound ground meat
½ cup breadcrumbs
3 Tbsp milk
1 egg
2 cloves garlic, grated
½ cup onion, grated and squeezed of excess juice
3 Tbsp fresh basil
1 Tbsp dried oregano
1 tsp red pepper flakes
2 tsp salt
1 tsp pepper

Extras:
Hearty hamburger buns
Your favorite red sauce
Arugula
Thinly sliced provolone cheese

Instructions:

  • Combine all ingredients for the cheese spread and mix well. Set aside.
  • Combine breadcrumbs with milk and egg and mix well
  • Add remaining burger ingredients and gently combine thoroughly
  • Form four patties and indent the center with thumb
  • Heat skillet over medium heat and cook burgers 3-4 minutes
  • Flip burgers (do not push down on them!) and spoon red sauce on top of each
  • Top each with a slice of provolone
  • Let cook an additional 3-5 minutes
  • While the burgers are cooking toast buns in an oven, toaster or in a separate skillet
  • Smear each bun top with a generous amount of the cheese spread
  • Smear each bun bottom with about 2 tablespoons of red sauce
  • Place burgers onto bun bottoms, top with arugula and serve
Posted in Sandwiches & Burgers | Tagged , , , , , , | 4 Comments

(Get on the) Banana Boat

Okay, this Simple Summer Sweet is not really a recipe at all it is so simple.

It is a weekday though so these fit the bill for a fun and simple treat.

They are perfect for your camping trip, an easy weekend around the fire pit or just relaxing in the back yard.

Topping choices are endless. I used the following to make different combinations: Marshmallows, Walnuts, Peanut Butter Chips, Toffee Chips and Dark Chocolate Chips.

  1. Throw some bananas on the grill and flip (you want them to turn a little dark)
  2. Cut a slit in them (don’t go through the peel on the other side)
  3. Stuff with toppings
  4. Put back on the grill with the lid down for 3 minutes.
  5. Spoon into face

You can’t get much easier than that.

Posted in Other Desserts | Tagged , , , , , , | Leave a comment

Blueberry Buttermilk Biscuits

I know it is officially summertime when I come home with pounds and pounds of blueberries that I woke up at some crazy hour to go pick from the local farm. I remember going blueberry picking with my grandmother and sister once and I was done with it after about 10 minutes (the hot, humid southern summer was certainly the final straw). My grandmother was determined to pick pounds of them whether we liked it or not. Now I can see why and I do not blame her one bit – blueberries are often referred to as nature’s candy and with good reason.

I got home from picking and went immediately to freezing the surplus and thinking of how to incorporate them into something wonderful, but not necessarily sweet. In my reminiscing I was reminded of the time I made biscuits with Grams. She did not make biscuits often but decided it was time to show me how. Of course, I have no idea what ingredients we used because I was more concerned with playing in the mess they made, so I turned to this recipe I have used for a few years, and adapted it to make these blueberry buttermilk biscuits.

If you have never made biscuits from scratch you are in for a real treat. They require just a few ingredients and no special tools are required. I used the food processor in this recipe because it makes them come together even faster. If you do not have a food processor then you can use a pastry cutter, fork or your hands. Just make sure to sift all the dry ingredients together before adding the butter.


Cube the butter and keep it in the fridge so it stays nice and cold (I like to do it the night before so I do not have to mess with it in the morning). Measure the dry ingredients into your bowl and pulse a couple times to mix. Add cold, cubed butter. Pulse food processor until the mixture resembles corn meal, like the picture below.


While pulsing, slowly add in the buttermilk just until the dough comes together and then turn it onto a floured surface. At this stage it will look like a somewhat crumbly mess that is not really a ball of dough. This is when you add frozen blueberries. I like them frozen first so they do not get too smashed up while you are rolling the dough.

Gently work the frozen blueberries into the dough softly kneading it until it holds a shape. Yes, it is messy. Embrace the mess. These are definitely not from a can!

Like I said, fancy tools are not required so if you do not have round biscuit cutters just use a bowl. Lightly press the bowl into the dough to make a dry run for the biscuits. The key is to only do this twice. Biscuits from the second pass will not be as good as the first because they will become tough. The bowl shown above was way too big for a normal sized biscuit. This of course was not realized until they came towering out of the oven. Try to use something 2-3 inches round.

What do you do with these once they are done? As pictured above, put some whole grain mustard on them with county ham for a delicious lunch. If you think this is crazy talk then please consult my husband who told me I was out of my mind. Then he had it for lunch and changed his tune!

If that is a little too adventurous then scoop some vanilla ice cream on a warm biscuit for shortcake-like biscuit delightfulness. Or just spread some butter onto them and have with your eggs for breakfast.

Sidenote: When you go blueberry picking (because you are not going to use frozen blueberries in the middle of summer, right?) tell the staff if it is your first time and they will tell you what to look for. Also, there is a chance you will be surrounded by blueberry picking pros so strike up a conversation and have fun enjoying the fruits of summer!

Ingredients:

2 cups all-purpose flour
2 cups cake flour*
4 tsp baking powder
1 tsp baking soda
1 tsp salt
12 Tbsp cold butter, cut into small cubes
1 ¼ cup buttermilk
1 ½ cups frozen blueberries

Instructions:

  1. Preheat oven to 450
  2. Line sheet pan with parchment paper and lightly spray with non-stick spray
  3. Combine dry ingredients
  4. Cut in butter until mixture resembles cornmeal
  5. Slowly add buttermilk
  6. Turn out onto floured surface
  7. Add frozen blueberries
  8. Gently knead blueberries in until just combined
  9. Roll to approximately 3/4 inch thickness and cut
  10. Repeat once more
  11. Bake for 15-20 minutes, until golden brown
  12. Serve immediately

*If you do not have cake flour you may use regular flour. The cake flour will give you a more tender biscuit.

Store leftover biscuits in an airtight container in the refrigerator.


Posted in Breads, Breakfast Eats, Other Desserts | Tagged , , , , , , , | 9 Comments

The Key (to perfect) Lime Pie

Key lime pie is my father in laws favorite dessert. So for this past Father’s Day I wanted to make him one, since store bought ones always seem to taste like lime-flavored chemicals or packaged gelatin mixes.

Key limes are so tiny and cute…I could not stop taking pictures of them. I cut each into four wedges to juice since they were too small for my citrus press.

There are a thousand recipes that call for sweetened condensed milk, cool whip topping and hardly any key lime juice. This will not do. I decided on cream cheese instead of cool whip topping and almost doubled what most recipes suggested for the juice. White chocolate was also added to the mix.

This was almost too simple to put this together. Enjoy!

Ingredients:

  • 1 Graham Cracker pie crust
  • 1 tablespoon key lime zest
  • 1/3 cup fresh squeezed key lime juice
  • 8 oz cream cheese, room temperature
  • 14 oz can sweetened condensed milk
  • 1 tsp vanilla extract
  • 1/3 cup white chocolate, melted
  • 1 key lime, for garnish

Instructions:

  • Whip cream cheese and sweetened condensed milk until fully combined
  • Mix in melted and cooled white chocolate
  • While still whipping, slowly add vanilla and key lime juice
  • Pour into prepared crust
  • Cover and refrigerate at least 4 hours, preferably overnight
  • Zest one key lime over pie before serving


Posted in Other Desserts, Pies | Tagged , , , , | 7 Comments

Smoked Blackberry Miso Salmon

Salmon. Deliciously meaty, always available and simple to prepare, this is the ideal fish to experiment with. There are a thousand different ways to prepare the king of fish. I tried it once with a brown sugar glaze but it was sickeningly sweet, although I enjoyed the caramelized crust it had. I tried again with a miso glaze but there was still missing something. I wanted it a little sweet, savory and with a twist. So while scouring my brain for ideas a light bulb went off and Smoked Blackberry Miso Salmon was born.

It all started with the cedar plank. My husband got a new grill recently and after talking him down from also getting a $300 smoker I was on a mission to find cedar planks to get that flavor. Now, don’t go down to the lumber yard and lob off a piece of cedar from any old board because they need to be food grade (aka – not treated with chemicals). Most kitchen supply stores have them or you can order them online. Let them soak at least 30 minutes before using them…you know, unless you want to burn your deck and house down.

I wanted the salmon to be savory much like the miso glazed one I had but it needed something acidic and sweet to make it all come together, so tart and sweet blackberries fit that bill.

I also grilled up a quick side of bok choy since this salmon had a bit of an Asian inspired flair. The leafy greens crisped up like kale chips and the stems were nice and soft.

There is a lot of controversy on what type of salmon to buy. If you do not want or like salmon you can try this marinade on another type of fish or even shrimp – choose what you want.

This really is one of the simplest recipes to prepare. You whisk everything together in a bowl and then let the salmon marinade in it for 30 minutes. Preheat your grill so it is nice and hot, place the fish on the plank and let it smoke with the lid down for approximately 10 minutes. Then brush more of the marinade on so you get a nice caramelized crust. Continue to smoke it with the lid down for 5-10 more minutes. To grill the bok choy brush it with olive oil, salt and pepper and let it cook about 10 minutes, flipping halfway through.

If you do not have a grill you can certainly try this recipe in the oven. Place the plank and salmon in a casserole dish and cover tightly with foil. Bake at 400 degrees until done, approximately 10-20 minutes.

Ingredients:

  • ¼ cup blackberry preserves
  • 4 Tbsp yellow miso paste
  • 2 Tbsp rice wine vinegar
  • 2 Tbsp mirin*
  • 3 Tbsp soy sauce
  • 1 Tbsp brown sugar
  • 1 pound salmon
  • Cedar plank (optional)

Directions:

  • Soak cedar plank in water for 30 minutes-2 hours
  • Whisk first 6 ingredients in a bowl
  • Place salmon in marinate and let rest 30 minutes at room temperature
  • Preheat grill or prepare charcoals
  • Place salmon on cedar plank and onto grill
  • Put lid down and let smoke for 15-20 minutes, brushing more marinate on halfway through.

*Mirin is in the Asian section in most grocers. It is typically with the soy sauce and pre-bottled stir fry sauces. You cannot really substitute anything for mirin so if you cannot find it just leave it out. Find it though – it is worth it!


Posted in Fish & Seafood | Tagged , , , , , | 2 Comments

Gooey Brownie Cookies

Cookies are not typically a summer thing but I am here to make a case for them. These are the cookie version of brownies, adapted from Bon Appétit magazine. Spoon on a scoop of ice cream to make even more indulgent.

Cover

They are incredibly easy, gluten free, and are sweet brownie rich chocolate chewy goodness. Too many adjectives? I don’t care. They deserve it.

P1110781

Do yourself a favor and make a batch of these. Trust me – you will not miss the gluten.

P1110793

Ingredients:
3 cups GF powdered sugar
1 cup unsweetened dark cocoa powder
1 tsp kosher salt
2 large egg whites
1 large egg
5 oz bittersweet chocolate chopped

Directions:
-Preheat oven to 350°
-Whisk powdered sugar, cocoa and salt in large bowl
-Whisk in egg and egg whites
-Fold in chopped chocolate
-Spoon onto parchment paper lined sheet pans, allowing plenty of space apart
-Bake 7 minutes
-Rotate pans
-Bake an additional 7-9 minutes until cracked and set around edges
-Let cool on sheet trays
-Store in airtight container at room temperature

Posted in Cookies, Gluten Free | Tagged , , , | 1 Comment